


Cats vs Dogs: Binary Classifier with PyTorch CNN


My base stack for deep learning is Tensorflow, but PyTorch has been growing exponentially. Therefore I am going to start exploring PyTorch more and more, so I decided to make some hello-world examples for me (and you) to be updated on how to do things with the Facebook/Meta approach for deep learning.
We will start our exploration by building a binary classifier for Cat and Dog pictures. The images were downloaded from the Kaggle Dogs vs Cats Redux Edition competition. There are 25,000 images of dogs and cats we will use to train our convolutional neural network.
If you are wondering how to get PyTorch installed, I used miniconda with the following commands to get the environment started.
# install conda environment with pytorch support
# - conda create -n torch python=3.7
# - conda activate torch
# - conda install pytorch torchvision torchaudio cudatoolkit=11.0 -c pytorch
Import Libraries
import numpy as np
import pandas as pd
import os
import random
import time

import torch
import torchvision
import torch.nn as nn
import torchvision.datasets as datasets
from torchvision import datasets, transforms
from torch.utils.data import Dataset, DataLoader
import torch.nn.functional as F

from sklearn.model_selection import train_test_split

from PIL import Image
import matplotlib.pyplot as plt
Download Data and Preprocess Images
Once you downloaded the data, put the training images in the data/train/ folder on your local computer. The following code will parse the train folder and will collect the path for each image and will save it into the img_files list:
img_files = os.listdir('data/train/')
img_files = list(filter(lambda x: x != 'train', img_files))
def train_path(p): return f"data/train/{p}"
img_files = list(map(train_path, img_files))

print("total training images", len(img_files))
print("First item", img_files[0])
output:
- total training images 25000
- First item data/train/cat.0.jpg
Before we start transforming our data, let's split the dataset into train-test sets with the following code.
# create train-test split
random.shuffle(img_files)

train = img_files[:20000]
test = img_files[20000:]

print("train size", len(train))
print("test size", len(test))
output:
- train size 20000
- test size 5000
Now, we have to use each path to load the image, convert it to RGB, and also label the image based on the name. If the word "cat" is in the path, then the label will be 0, otherwise 1 for a dog. Additional transformation is needed for the image, so a transform object will be created to resize the image to 244x244 and normalize its values. The following class will receive a Dataset (from torch.utils.data) and will apply the transformation.
# image normalization
transform = transforms.Compose([
    transforms.Resize((224, 224)),
    transforms.ToTensor(),
    transforms.Normalize((0.5,), (0.5,))
])

# preprocessing of images
class CatDogDataset(Dataset):
    def __init__(self, image_paths, transform):
        super().__init__()
        self.paths = image_paths
        self.len = len(self.paths)
        self.transform = transform

    def __len__(self): return self.len

    def __getitem__(self, index):
        path = self.paths[index]
        image = Image.open(path).convert('RGB')
        image = self.transform(image)
        label = 0 if 'cat' in path else 1
        return (image, label)
Ok, let's use the CatDogDataset class to transform the train and test sets and convert them into an iterable dataset that PyTorch can use to train the model.
# create train dataset
train_ds = CatDogDataset(train, transform)
train_dl = DataLoader(train_ds, batch_size=100)
print(len(train_ds), len(train_dl))

# create test dataset
test_ds = CatDogDataset(test, transform)
test_dl = DataLoader(test_ds, batch_size=100)
print(len(test_ds), len(test_dl))
output
- 20000 200
- 5000 50
Convolutional Architecture
PyTorch uses a pythonic approach to define the architecture of the neural network in contrast to how you usually do it with Keras. The following architecture is simple, contains 3 convolutional layers with the core neural network composed of 3 fully connected layers. This architecture is not optimal but serves the purpose of testing the model. I recommend you to change this architecture (increase layers, change depth, etc) to get different results.
# Pytorch Convolutional Neural Network Model Architecture
class CatAndDogConvNet(nn.Module):

    def __init__(self):
        super().__init__()

        # onvolutional layers (3,16,32)
        self.conv1 = nn.Conv2d(in_channels = 3, out_channels = 16, kernel_size=(5, 5), stride=2, padding=1)
        self.conv2 = nn.Conv2d(in_channels = 16, out_channels = 32, kernel_size=(5, 5), stride=2, padding=1)
        self.conv3 = nn.Conv2d(in_channels = 32, out_channels = 64, kernel_size=(3, 3), padding=1)

        # conected layers
        self.fc1 = nn.Linear(in_features= 64 * 6 * 6, out_features=500)
        self.fc2 = nn.Linear(in_features=500, out_features=50)
        self.fc3 = nn.Linear(in_features=50, out_features=2)


    def forward(self, X):

        X = F.relu(self.conv1(X))
        X = F.max_pool2d(X, 2)

        X = F.relu(self.conv2(X))
        X = F.max_pool2d(X, 2)

        X = F.relu(self.conv3(X))
        X = F.max_pool2d(X, 2)

        X = X.view(X.shape[0], -1)
        X = F.relu(self.fc1(X))
        X = F.relu(self.fc2(X))
        X = self.fc3(X)

        return X
Model Traning
Ok, we are all set to train our data against the CatAndDogConvNet model. The following code will do the hard work. Please note that the accuracy and loss functions are loaded from the PyTorch libraries but the performance metrics are calculated manually.
# Create instance of the model
model = CatAndDogConvNet()

losses = []
accuracies = []
epoches = 8
start = time.time()
loss_fn = nn.CrossEntropyLoss()
optimizer = torch.optim.Adam(model.parameters(), lr = 0.001)

# Model Training...
for epoch in range(epoches):

    epoch_loss = 0
    epoch_accuracy = 0

    for X, y in train_dl:

        preds = model(X)
        loss = loss_fn(preds, y)

        optimizer.zero_grad()
        loss.backward()
        optimizer.step()

        accuracy = ((preds.argmax(dim=1) == y).float().mean())
        epoch_accuracy += accuracy
        epoch_loss += loss
        print('.', end='', flush=True)

    epoch_accuracy = epoch_accuracy/len(train_dl)
    accuracies.append(epoch_accuracy)
    epoch_loss = epoch_loss / len(train_dl)
    losses.append(epoch_loss)

    print("\n --- Epoch: {}, train loss: {:.4f}, train acc: {:.4f}, time: {}".format(epoch, epoch_loss, epoch_accuracy, time.time() - start))

    # test set accuracy
    with torch.no_grad():

        test_epoch_loss = 0
        test_epoch_accuracy = 0

        for test_X, test_y in test_dl:

            test_preds = model(test_X)
            test_loss = loss_fn(test_preds, test_y)

            test_epoch_loss += test_loss
            test_accuracy = ((test_preds.argmax(dim=1) == test_y).float().mean())
            test_epoch_accuracy += test_accuracy

        test_epoch_accuracy = test_epoch_accuracy/len(test_dl)
        test_epoch_loss = test_epoch_loss / len(test_dl)

        print("Epoch: {}, test loss: {:.4f}, test acc: {:.4f}, time: {}\n".format(epoch, test_epoch_loss, test_epoch_accuracy, time.time() - start))
- Epoch: 7, train loss: 0.2084, train acc: 0.9138, time: 871.9559330940247
- Epoch: 7, test loss: 0.5432, test accracy: 0.8340, time: 890.4497690200806
As we can observe the model train accuracy reached 91% with 83% for the test set. Not bad, but this can be improved!
Making Predictions
We will re-use the CatDogDataset to create the TestCatDogDataset a class that pretty much does the same thing, but returns the image object and the file id, as the /data/test/ folder contains a set of unlabeled images.
test_files = os.listdir('data/test/')
test_files = list(filter(lambda x: x != 'test', test_files))
def test_path(p): return f"data/test/{p}"
test_files = list(map(test_path, test_files))

class TestCatDogDataset(Dataset):
    def __init__(self, image_paths, transform):
        super().__init__()
        self.paths = image_paths
        self.len = len(self.paths)
        self.transform = transform

    def __len__(self): return self.len

    def __getitem__(self, index):
        path = self.paths[index]
        image = Image.open(path).convert('RGB')
        image = self.transform(image)
        fileid = path.split('/')[-1].split('.')[0]
        return (image, filed)

test_ds = TestCatDogDataset(test_files, transform)
test_dl = DataLoader(test_ds, batch_size=100)
len(test_ds), len(test_dl)
output:
- (12500, 125)
Let's now make predictions for the entire unlabeled test set from the /data/test/ folder. We will store the probabilities of the image to be a dog P(Image|dog) in the dog_probs list:
dog_probs = []

with torch.no_grad():
    for X, fileid in test_dl:
        preds = model(X)
        preds_list = F.softmax(preds, dim=1)[:, 1].tolist()
        dog_probs += list(zip(list(fileid), preds_list))
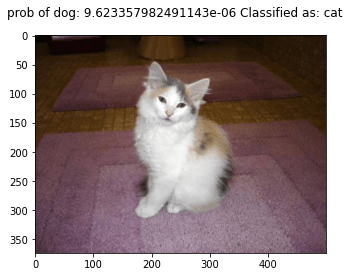
Let's print the top 5 images to see what the algorithm predicted in unseen images:
%matplotlib inline
# display some images
for img, probs in zip(test_files[:5], dog_probs[:5]):
    pil_im = Image.open(img, 'r')
    label = "dog" if probs[1] > 0.5 else "cat"
    title = "prob of dog: " + str(probs[1]) + " Classified as: " + label
    plt.figure()
    plt.imshow(pil_im)
    plt.suptitle(title)
    plt.show()
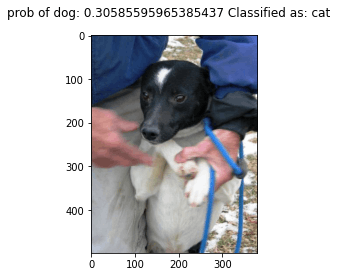
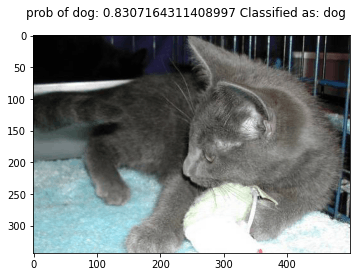
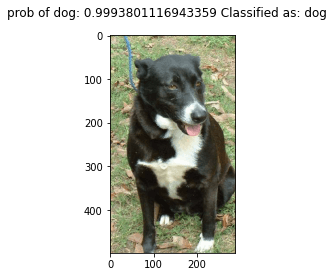
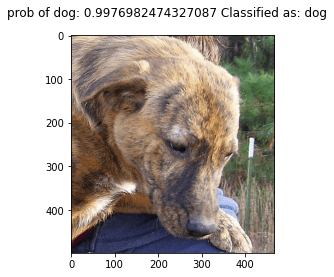
The classifier is not perfect and still making mistakes. How do we solve this? let's try another approach that has proved to be very effective in training convolutional neural networks to achieve state-of-art performance: transfer learning. I will replicate this same example using transfer learning in my next post to check the difference.
Kudos to chriszoufor the original code for this post.